Introduction This is an experience report of how we tested our Confluence apps for the Atlassian Data Center requirements. While we successfully had most of our apps Data Center verified with this procedure, your app might require a different approach. There are many frameworks and procedures for performance/scale testing out there and you should choose the one that best fits your scenario. While we encourage you to have a look at our open source E4 framework that we used, we would like to point out that we do not provide active support and maintenance for the project. It is meant to be an open source community project with an "accepted uncertain future".
What is this about?
Atlassian app vendors are required to process through a fairly complex approval process with Atlassian for an app to be named officially Data Center ready. The major part of this process is called performance and scale testing with the goal being, put simple, to prove that your app doesn’t break the host product. The idea is to simulate a as-realistic-as-possible enterprise Data Center environment with users using the host product and interacting both with the app and the vanilla features of the platform.
While this all sounds like a great quality assurance strategy at first (in theory I think it really is), implementing these requirements and simulating this environment is very hard. For example, in order to test a Confluence app on Data Center, our testing procedure involves the following parts:
- Setup a Confluence Data Center instance with a large dataset involving 1 million pages, 5000 spaces, 100,000 users, and 150 million group memberships.
- Maintain the baseline state of this instance (i.e. the instance must be somehow resettable to exactly this dataset).
- Alternate the number of Data Center nodes for the instance (e.g. start the instance with 1, 2, 4 application nodes respectively).
- Programmatically make different numbers of users (e.g. 50, 150, 250 concurrent users respectively) interact with Confluence in a realistic way.
- Programmatically make a fragment of those users use the features of your app and the other fragment use vanilla Confluence features.
For this seemingly complex process, the tooling provided by Atlassian so far has been… errr. Let’s say there has been room for improvement. And Atlassian is actually quite upfront with this and the manual performance and scale testing states: “Atlassian specific performance testing tools are not currently available for all products […] For generic request testing like this, we encourage you to use leading performance and quality testing products available.” This recommendation is followed by links to generic testing tools like Selenium and Taurus.
Reading over these instructions and requirements, the app developer’s first reaction – as I feel confident to generalize – is something like WHERE THE HELL DO I EVEN START?! In consequence, the vendor community has seen an intense flow of “How did you do it??” communication and desperate help-seeking like “Anyone willing to provide a Data Center consultant? Willing to pay $$$!”
Our own data center story
We started testing our first Confluence app using the Atlassian recommended Performance Testing Framework. While we slowly made our progress, our minds became more troubled by a few uncomfortable insights:
- Our AWS bills grew and grew without us knowing exactly why
- We couldn’t get some parts of the framework work for us and had to rebuild parts
- The framework is based on REST interaction only but most of our app features could hardly be isolated with REST interaction
- “Wait, there’s yet another framework for Jira apps?!”
Despite these struggles we eventually had our first Confluence app Data Center approved using the recommended framework. But the road was rocky and it took several months from us studying the process for the first time to the final approval. There was some feeling of success, but overall we weren’t in the mood to celebrate: this was one out of 11 Scandio Atlassian apps and there was no strong indication that the process would become a lot easier subsequently. Essentially, we felt stuck and didn’t really know how to keep going. We joined the help-seeking folks in the vendor community, expressed our troubles and hoped for help from others. It turned out many others faced similar issues and most of them implemented their own home-baked solutions for the testing procedure. But none of them was really made available to other vendors.
Our next step was to let the Confluence side rest for a bit and look on the Jira side. After all, we also had a Jira app on the marketplace that eventually needed approval and we knew that there was a different recommended framework called Jira Performance Testing (JPT) for Jira apps. The first impression was that the framework was entirely different: users were simulated as interacting with a browser using Selenium rather broken down into REST calls. Now this was an improvement! But while we dived into JPT more deeply, we also had our issues:
- We didn’t like the fact that seemingly arbitrarily big AWS instances were started and stopped without us seeing what’s going on and why
- Now we only had tooling for Selenium but we still wanted to simulate users with REST as well (we wanted both)
- We were confronted with issues that kept procedures stopping with seemingly random error messages that were hard to troubleshoot
- “Wait, this is for Jira only!!! But we have 8 more Confluence apps to test!!!”
The feeling of being trapped and stuck was now even stronger than after the approval of our first Confluence app. Then two things occurred:
- We found a (amazing!) dockerized data center environment where nodes can be added and removed with a simple command
- The 2019 ShipIT event at Scandio was about to take place
This is when we decided: let’s do it ourselves! But this time let’s make sure that:
- It works with both Selenium AND REST
- It works with both Confluence AND Jira (or ultimately any other web application)
- It works on any server landscape and is independent from AWS
The result was our E4 Framework which we now open sourced. By now, 6 of our Confluence apps have been approved.
One example data center test procedure
We now describe how we tested our Confluence app Page Branching for Confluence Data Center. This should be read in a “How did we use E4?” fashion, i.e. it will remain on a high level, rather than explaining the details (that would make this post a looot looonger!).
Test Package
A test package defines how users interact with an app and is implemented in Kotlin. Page Branching is, in short, an app to create branches of pages in Confluence that can later be merged back into the main page - very much like in version control tools like Git. On the top level is a PageBranchingTestPackage class which implements a method getVirtualUsers that defines what virtual users should interact with the system. In our case it looks like this:
override fun getVirtualUsers(): VirtualUserCollection {
    val virtualUsers = VirtualUserCollection()
    virtualUsers.add(Commentor::class.java, 0.04)
    virtualUsers.add(Reader::class.java, 0.2)
    virtualUsers.add(Creator::class.java, 0.04)
    virtualUsers.add(Searcher::class.java, 0.08)
    virtualUsers.add(Editor::class.java, 0.08)
    virtualUsers.add(Dashboarder::class.java, 0.08)

    virtualUsers.add(BranchCreator::class.java, 0.04)
    virtualUsers.add(BranchMerger::class.java, 0.04)
    virtualUsers.add(BranchOverviewCreator::class.java, 0.04)
    virtualUsers.add(BranchOverviewReader::class.java, 0.04)
    virtualUsers.add(BranchedPageReader::class.java, 0.16)
    virtualUsers.add(OriginPageReader::class.java, 0.16)
    return virtualUsers
}
The first segment with the virtual users Commentor, Reader, Creator, Searcher, Editor, Dashboarder specifies the vanilla users that are independent from the app. These are the same for all apps. The names of the virtual users should be expressive enough to get a sense of what they are doing.
The second segment is the app-specific virtual users: BranchCreator, BranchMerger, BranchOverviewCreator, BranchOverviewReader, BranchedPageReader, OriginPageReader. These virtual users constitute the users that perform app-specific actions against the system (using a mix of Selenium and REST).
Additionally, each virtual user has a floating point number that defines its weight. The sum of all weights must always be 1. In this case, we gave a total of 0.52 to the vanilla users and 0.48 to the app-specific users. Later, the tester can specify a number of concurrent users to simulate load on the system and these concurrent users will be divided onto these virtual users. For example, if 150 concurrent users are specified, 150*0.04=6 BranchCreator virtual users will be created.
Example Action
Now let’s look at CreateBranchAction which is what specifies what the user really does “in one go”. This action will later be repeated in a loop for the virtual user instance.
override fun execute(webClient: WebClient, restClient: RestClient) {
val webConfluence = webClient as WebConfluence
val dom = webConfluence.dom
val originPageTitle = "CreateBranchAction (${Date().time})"
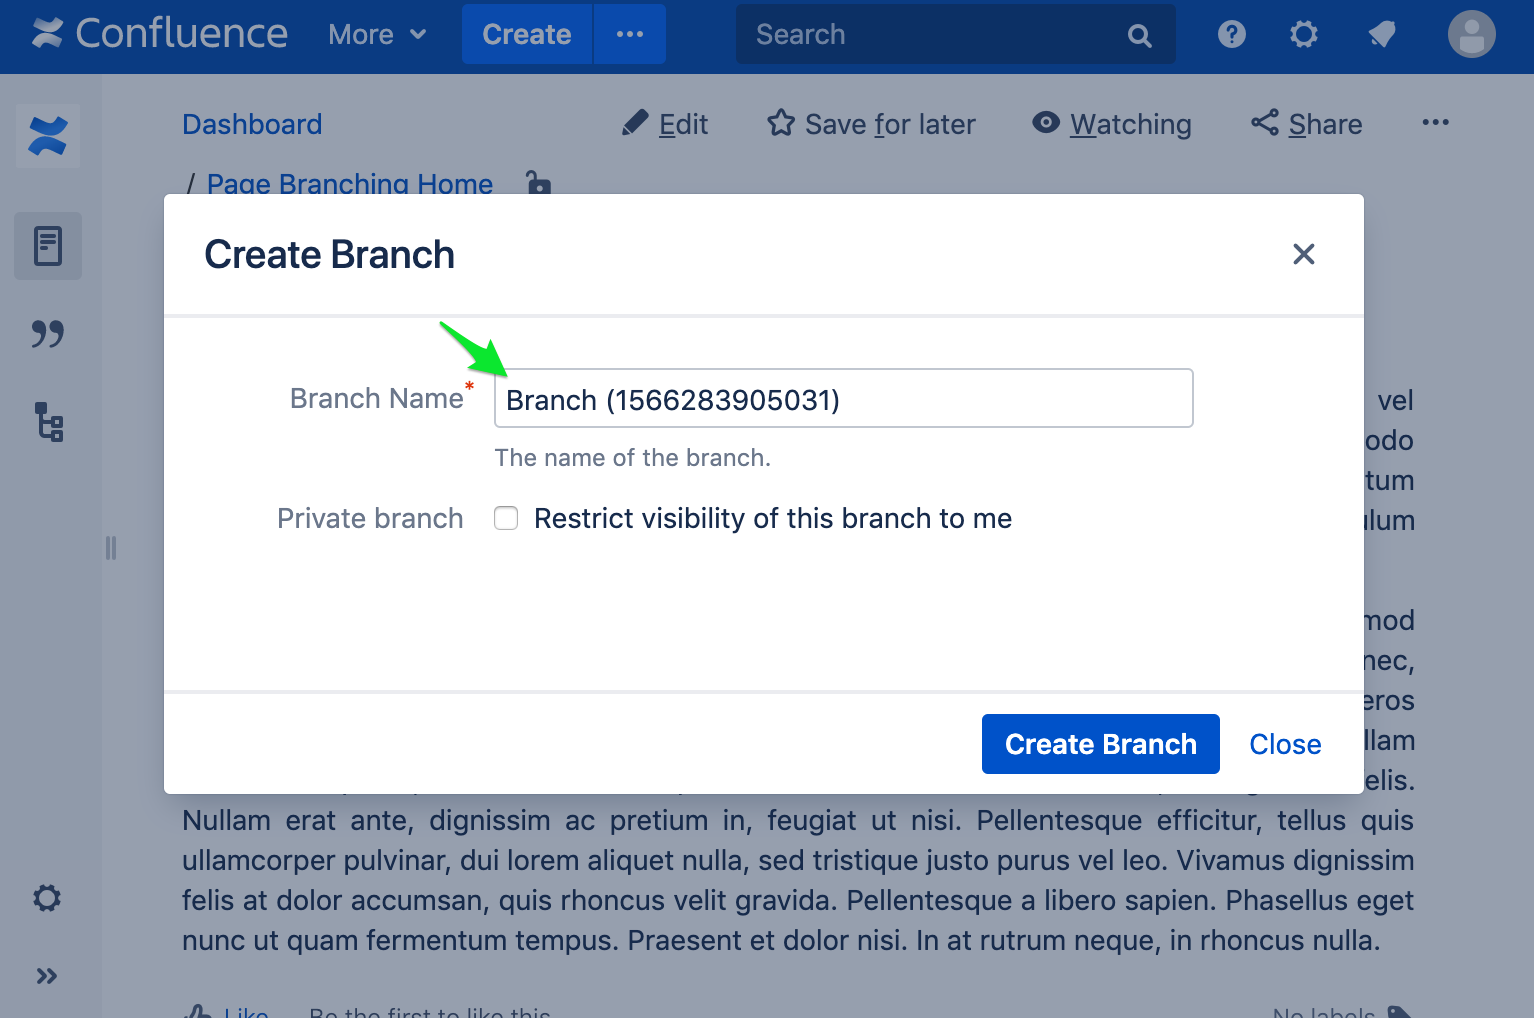
val branchName = "Branch (${Date().time})"
webConfluence.login()
webConfluence.createDefaultPage(spaceKey, originPageTitle)
this.start = Date().time
webConfluence.goToPage(spaceKey, originPageTitle)
dom.click("#action-menu-link")
dom.click(".pagebranching-create-branch-link")
dom.insertText("input#branch-name", branchName, true)
dom.click("#pagebranching-branch-page-button")
dom.awaitElementPresent(".page-branching-branch-meta")
this.end = Date().time
}
A bit more code this time. Luckily, the WebConfluence (think “what constitutes a Confluence web app”) and DomHelper (Selenium util class) classes have become quite extensive libraries and normally actions will comprise only a number of subsequent such library calls.
As a picture story, this action will perform the following steps:
Step 1: webConfluence.createDefaultPage

Step 2: webConfluence.goToPage

Step 3: dom.click("#action-menu-link")

Step 4: dom.click(".pagebranching-create...")

Step 5: dom.insertText(...)
Step 6: dom.click("#pagebranching-...")

Step 7: dom.awaitElementPresent(".page-branching...")

Note that we record the time it takes to perform the action we want to measure between the calls to this.start = Date().time and this.end = Date().time. We can then return the difference with our implementation of getTimeTaken (each action must implement this method) which can be used for the performance evaluation in a later step.
Start a Confluence Data Center cluster and execute the test package
On a powerful enough machine, we now start a Confluence 6.15.3 Data Center cluster test instance provisioned with a large dataset with the following command:
The scale parameter specifies that we want to start this cluster with one node.
Additionally, we start a E4 worker node on another powerful enough machine. The worker node will be responsible for executing the virtual users:
The worker will now listen for directions on port 3000 and will know at what IP address the Confluence cluster is running. We now create a E4 Client configuration to specify what we want the worker to run:
This configuration should be pretty self-explanatory. First, it specifies where Confluence is accessible and what the admin credentials are. It then specifies what test package to run (in this case we want to run the vanilla test package first). We want to run the test package with 150 concurrent users and a duration of 600 seconds (i.e. 10 minutes). This means that all virtual users and their actions will be repeated in a loop until 10 minutes have passed. Finally, we specify what workers we want to use. In our case, we have only one worker which is accessible at http://e4w:3000 (assume we have the hostname-IP mapping in our /etc/hosts file).
We then run the E4 executable with this command:
This will now orchestrate our worker which will create 150 threads for our 150 concurrent users. We uploaded an example log file of a worker doing its thing. The logs should provide a good picture of what’s really going on during an E4 test.
Processing the test results
We conducted our tests with configurations of 1/2/4 nodes and 50/150/250 users respectively. We first performed these 3x3=9 configurations with our VanillaTestPackage and then again for each other app-specific test package. The result of each of these runs is an SQLite database with a table for all measurements that looks like this:

The SQLite database has a second table for all errors that occurred. While some errors can be tolerated (not every Selenium action always works 100% reliably), one should definitely check the worker log if many errors occur repeatedly.
From these results, we then created a Google Spreadsheet in order to generate charts (impressively straight-forward!):

Our spreadsheets for each app had the following sub-sheets:
- vanilla_no_app: results for the vanilla tests without app
- vanilla_with_app: results for the vanilla tests with app
- noapp_vs_app: the above results in comparison
- lb_vanilla: load balancing of the tests without app (i.e. what node received how many actions)
- lb_app: load balancing of the tests with app (i.e. what node received how many actions)
Using all the data and charts, it was fairly easy to create a document that described our testing procedure and the results. We created these in (guess!) Confluence, exported them to PDF and sent them over to Atlassian on the respective DCHELP tickets.
Summary
This was only a rough breakdown and outline of how we tested our Confluence apps for Data Center. We could have written many more details on the testing procedure, like server infrastructure, result processing scripts, Selenium libraries, unit testing test packages, etc. Without doubt, this would have gone beyond a Scandio blog post (maybe this one already is?). We still hope, despite remaining mostly high level, that we could shed some light on the world of us Atlassian app developers having to deal with the jungle of the data center approval world which we have been faced with recently.

.png)

.png)